5 Amazing yet hidden Windows 10 features you didn’t know about!

Windows 10 has officially been with us for close to a year now, and very less of us has truly explored what it is all about. Mostly people didn’t understand Windows 8.1, but we don’t love the current version either. Here’s some “hidden” features that’d make you feel better about Windows 10.

The hidden battery report:
52421601

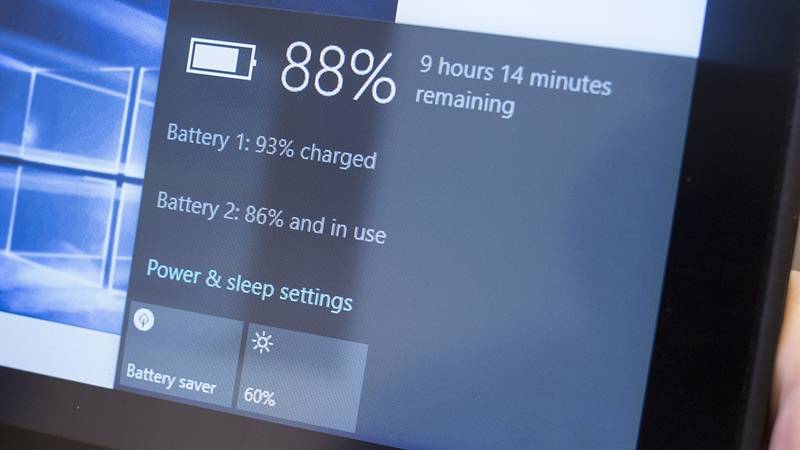
Everyone likes to keep track of their battery consumption, and while the tiny bar does little wonders for accuracy, you can find a more detailed and thorough battery report available too, giving you useful information on its overall health and how much time of use you’re getting between charges.

If you’re using Windows 10 on a tablet or laptop, right-click on the Start menu button then choose Command Prompt (Admin), then type powercfg /batteryreport /output “C:\battery_report.html” into your new command window. Open the HTML file to get a host of useful stats and data on your battery.

This \battery report continues from the older versions of Windows.

Print to PDF:
52421602

Remember when we were forced to use the XPS format with Windows 8? Those days are long gone.

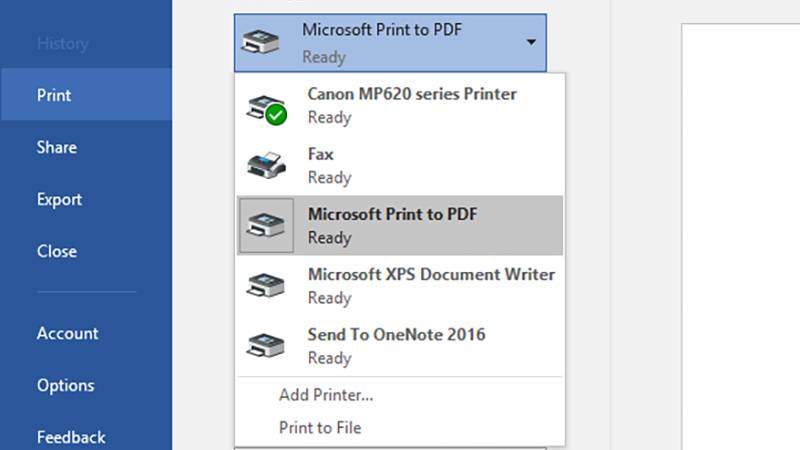
This feature saves the time and trouble of having to mess around with plug-ins to do the same job. You can freely choose an output format you know everyone is going to be able to open and view.

In whatever program you want to print from (standard desktop or universal app), choose Microsoft Print to PDF from the list of available printers. And choose your filename and location.

The God Mode shortcut:
52421603

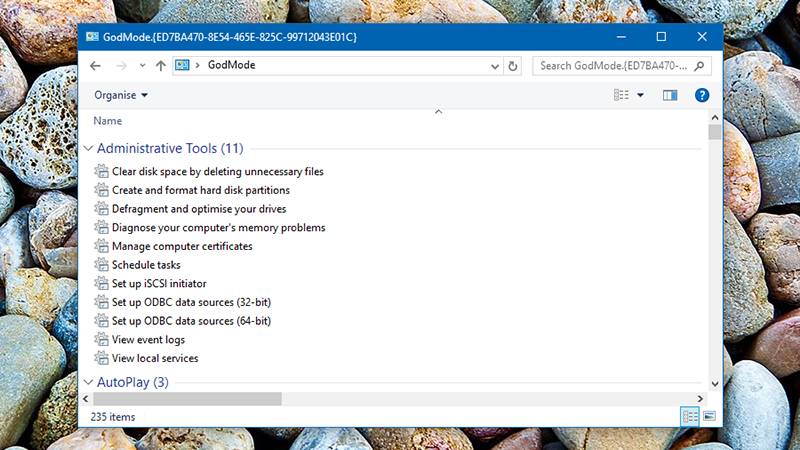
This one doesn’t take over completely, but it does give you quick and easy access to some of the key parts of the Windows operating system.

Just create a new folder anywhere you like on your system (the desktop works well) and name it GodMode.{ED7BA470-8E54-465E-825C-99712043E01C} (you can replace “GodMode” with anything you like). A double-click on your newly created folder and you’re in business, able to play around with settings for devices, networks, attached displays and more.

[adinserter block=”7″]

Next Page For More

Tagged : /

First thing first! Install THESE Apps today to unlock the full potential of your Android device!

Android operating system offers a much higher level of customization than its rivals iOS and Windows. Your smartphone has countless pre-installed features, and there’s no dearth of apps for even more.

Here’s a list of android apps that’ll make you regret you didn’t know about them before.

Discreet Notifications:

The AcDisplay app emulates the feature available for phones with AMOLED screens, which lights discreetly when there is a new notification when the screen is locked. With AcDisplay, see your notifications pop up on a minimal beautiful screen, remain for a while and then disappear.

You can instantly access them, or swipe to remove them.

The app also makes use of available sensors (Proximity, accelerometer) to turn on the screen when you take it out of your pocket, or when you pick up from a table.

It consumes surprisingly less of the battery and you’ll be hooked onto it from the start. Install the AcDisplay app from here.

Custom ROM features on your stock ROM

While custom ROMs are always useful, they take are tedious to try and install and to set up.

Gravity Box is a tweak box which brings all those features available in custom ROMs, ready to be implemented as and when you wish. You can tweak almost every aspect of your phone, right from the lock screen to the status bar to the app drawer style. You could spend an hour or so inside the app setting up your phone just the way you want.

You need to root your phone and download the Xposed Framework, through which, you can download Gravity Box. But it’s totally worth it. Download the Xposed Framework first from here and then install Gravity Box from the list of modules.

Bluelight Filter for your nerves:

The exposure of blue light from our smartphone has always been a source of debate about its effects on our circadian cycle and our quality of sleep.

The Twilight app makes your screen adapt to the time of the day. It will filter the blue light emitted by your device after sunset to protect your eyes, with a soft red filter. The filter intensity is adjusted to the sun cycle based on your local sunrise and sunset times. Use Twilight to protect your eyes, when reading in your bed before sleep and get a good night’s sleep. Download the app from here.

Essential information without having to unlock your screen:

The Dashclock widget appears to be a simple clock widget which sits discreetly on your home and lock screen. But, in reality, it could allow you take a peek into the most important notifications with a single glance.

With the Dashclock widgets and the myriad of extensions available in the Play Store, you can get all the information from missed calls to unread emails to cricket scores, right on your lock screen, in a beautiful minimalist way.

It is an extremely lightweight app and consumes minimal battery. Download the widget from here.

Next Page For More

Tagged : /

Unlock the full potential of WhatsApp with these secret hacks!

WhatsApp is a pretty amazing app. People did catch on early on. And now, as its user base continues to grow, it has managed to enter every sphere of your life. Be it friendly chats or business discussions, WhatsApp is here to stay. But are there any benefits of WhatsApp you’re completely missing out on?

To start with, constant notifications irritate us all at some point. And once you have gone online, or read a message, there’s no going back. You’ve to reply, or the person will know. Is there no way out?

Read your messages with ‘Last Seen’ and ‘Read’ status unaltered.

If you want to avoid explaining why you haven’t replied in spite of your ‘last seen’ timestamp and ‘Read’ status updated, you can use this trick.

Dedicate a home screen to a 4×4 WhatsApp widget. All unread messages will appear there, not only the most recent unread message from each chat. Read through all of those messages through the widget and your ‘last seen’ and ‘read’ status will remain unchanged. This really does work like a charm.

Transfer files of any format upto 1 GB on WhatsApp.

What, you thought 16 MB was the limit? An App called WhatsTools sits quietly inside the ‘attach’ button in the chat window (after giving permission using the accessibility service) and allows file sharing of size upto 1GB.

Using this tool, you can bypass the restriction to 16 MB.

You can also pause/resume the upload/download of files and preview video files before downloading. The files are shared through an HTTPS encrypted path and gets stored in your Google Drive account.

Delete old WhatsApp Message Backups and clear space on your phone storage.

Well yeah, your memory filling up- fast. Instead of deleting your precious photos, delete useless chats that have long ended.

To delete the older backup files, go to Internal Storage-> WhatsApp -> Databases.

WhatsApp does a mandatory daily backup in the middle of the night at 02:00. These backups are stored as separate files in the storage memory of your device and with each new backup, containing the thumbnail of all the media received along with newer chats, the file size increases, sometimes to uncomfortable proportions.

This backup to drive feature can also be used while shifting or restoring your phone.

Next Page For More

Tagged : /

The physics behind much hyped Hyperloop: Exclusively for you!

There has been a lot of talk about the Hyperloop concept and the amazing transportation system it promises to bring into human lives. This is a high-speed train that would make the trip from San Francisco and Los Angeles in just 30 minutes. The propulsion system was tested a few days ago by the Hyperloop One Company, in the desert outside Las Vegas.

Basic CMYK

In this same project, another startup called Hyperloop Transportation Technologies also announced that it had licensed a promising technology called Inductrack from Lawrence Livermore National Laboratory for its own Hyperloop design. If you haven’t yet got a chance to understand the Hyperloop transportation system and the physics behind it, then go through this article and then the video accompanying it. You will surely understand a lot.

It was in 2012, that Elon Musk had made an announcement about a new theoretical transportation method which presented the idea of a capsule that will propelled through a tube at over seven hundred miles an hour. He gathered some great minds from SpaceX and Tesla to create a prototype. Known as Hyperloop, the technology consists of a low pressure tube with capsules that transport at both high and low speeds. This system will run between San Francisco and Los Angeles and complete the journey in 30 minutes. There are certain physics concepts that it uses.

Friction and Hyperloop: Everything has friction, for example a brick lying on the floor has static friction which is the type of friction that keeps it in place, once the brick starts moving it encounters sliding friction. If something is rolling then it has rolling friction which is similar to a car wheel or any wheel in general when something is making constant contact at a particular point with a very small amount of friction. The fluid friction is when anything is moving and in counter resistance with the air for example airplanes or anything that has to move through air at a speed.

[adinserter block=”7″]

Next Page For More

Tagged : /

What should you do to restore a damaged PC due to power outage or surge?

These days, electronic devices and PCs are lifelines for us and we are completely dependent on those. But, because these devices are completely dependent on electricity, there is always a risk of damage due to power fluctuation or surge. There is always a possibility of power failure or surge due to storms, hurricanes, heavy rains, snow etc., which can damage your PCs and electronic devices.

battery

Subsequent to the electrical surge, your PC may reach a state where it won’t start at all, if the inner mechanism gets damaged. You should be aware of the precautions, which need to be taken so that your PC doesn’t get damaged due to power surge. Below are the measures which you must take to prevent damage in the first place itself:

  • Unplug your PC, in case of power outage.
  • Keep one light plugged in. This will let you know when electricity is back.
  • Have a backup of all the important files on an external USB drive. This will help you to retrieve the files, in case of data loss.
  • Install a barrier like surge protector, which shall protect your PC by nullifying the sudden power surge.
  • Having a UPS installed will give you enough time to complete your routine of shutting down your PC.

Follow the ways given below, to restore a damaged PC affected by power outage or surge.

There can be two possibilities because of which your PC will fail to start. The first possibility is damage to your power supply and second possibility is the damage to the device. You can replace the damage made to the power supply on your own, but, you need an expert in case the device is damaged itself. The following will help you to take some actions related to device damage.

Problem with the motherboard can lead to irregular working of your PC. You can correct this by:

  • Removing the small battery from the motherboard, and restart the PC, inserting the battery again after 5 min.
  • Buy an identical motherboard.
  • Buy a new motherboard.

If your PC is working irregularly, then it can be a mainly the problem of the motherboard. There is small chance that the CMOS information is scrambled. To correct this, you can remove the small battery on motherboard. Insert it after five minutes and restart your PC.

[adinserter block=”7″]

As a technology lover you may like our daily important technology news series. It’s a playlist and you can retrieve the total day-wise videos. Please consider subscribing our YouTube channel:

Author: Technology and Beyond

Tagged : /

Do you not switch off your computers/ devices routinely? See why and how it is harmful!!

If you are not switching off the electric items when you are not using them, you are actually wasting electricity and electricity costs money.  Move over, you are damaging the planet, you depend on, by burning the carbon to generate electricity.

According to computer technicians, PCs/desktops are meant to stay on for long period of time but you should set your PC to go into sleep mode after a specified period of non-usage. But, in case of laptops, you need to turn it off, if it is not properly set up to permit cooling at the Base of unit. Otherwise, this may damage your device due to overheating and burnout of the processor.  To save the energy and to prolong the life of your laptop/PC, you need to keep the air vents clean. Also, most probably, you will suffer the problem of disconnect, if you will leave your modem or router on for long time.

Here is the list of problems you will suffer, if you are not turning off your electronic items for a long time:

Overheating

In the system like pc and laptop, overheating occurs due to their excessive use. It may, eventually, destroy the hard drive and you may lose your important data. Motherboard may also get burnt in this process. Therefore, in order to prevent it from overheating, turn off your pc/laptops and make sure, proper air should enter in your pc for cooling purpose.

Wi-Fi or internet network problem

In case, there is some problem associated with your Wi-Fi and internet connection, there is a chance that it is related to the software of your modem or router. In order to solve this problem, restart the router by unplugging it from the power socket and then plug it back. This, power cycling, enables the devices to boot afresh and acquire a new snapshot of the network. This is especially required when there is some change in the network in terms of hardware, software or configurations.

That’s why it is important to turn off your pc, laptop, router, modem and other electronic equipment as and when possible.

Here are the reasons to keep your pc/laptop on and off:

Reason to keep it on 

  • When you are using your computer as a server.
  • When you are allowing activities like background updates, virus scan to occur while you are away.

Reasons to keep it off:

  • To save electricity.
  • To increase the performance of the electronic items.
  • To slow down natural degradation process

[adinserter block=”7″]

As a technology lover you may like our daily important technology news series. It’s a playlist and you can retrieve the total day-wise videos. Please consider subscribing our YouTube channel:

Author: Technology and Beyond


Tagged : /

Should you safely eject or simply pull out USB drives?

Most of us just pull a flash drive out, instead of safely removing it. Operating Systems treat the disks as objects, which can be trusted to not change the state suddenly.

6984516173_1fe5df5693_k_web_1024

The OS expects the files to remain accessible, while reading or writing, and, not suddenly disappear in the middle of the process.

There are two answers to whether you should eject a flash drive or not.

A short answer to this is yes one should always eject a drive before removing it. Mac and Linux will provide you a way to eject a drive always, but sometimes windows do not have an eject option for selected drives. On Windows select the “Safely remove hardware” option from the system tray and select the drive you want to remove.

A long answer to this is, that in windows, one can remove a flash drive without ejecting sometimes.

Here is a bit more of information on how computers actually deal with USB drives.

Why computers want you to eject drives?

Removing out a drive, while it is being written can corrupt the data. However, even though the drive isn’t actively being written to, it can still corrupt the data. Most of the OS uses write coaching to get better performance out of your computer.

While you write a file to another drive, for example, a flash drive, the OS waits to actually perform that action, till it has a number of requests to complete. It then completes all of them together. Clicking on eject button, tells your OS to flush the cache, which means it makes sure that all pending actions have been performed. You can safely unplug the drive now without any data corruption.

[adinserter block=”7″]

Next Page For More

Tagged : /

Exclusively for you: THIS is how to use the headphone as iPhone Camera Remote

Most of the time, the iPhone’s camera app shutter button is inconvenient for clicking pictures, especially, if you are operating it with one hand. As an alternative, you can always use the volume button of the phone to click pictures.

iphone-headphones-as-camera-shutter-remote

But, there is yet another way to click a picture, which most of the users are not aware of.

This trick has been around for years, yet you might have not tried it. The two volume buttons on your iPhone headphones can act as shutter button to click pictures.

You can click pictures with one hand and keep the phone upward with the other. This works for videos as well. You can use the headphones as a wired remote.

It might save you from the hassles of juggling with your phone in awkward situations.

[adinserter block=”7″]

As a technology lover you may like our daily important technology news series. It’s a playlist and you can retrieve the total day-wise videos. Please consider subscribing our YouTube channel:

Author: Technology and Beyond

Tagged : /

While Virtual Reality is coming in a big way, check, if your PC is ready for it!

Virtual reality is coming faster than anyone thought. The time is not far when you will be able to enjoy games on computer and other programs in 3D with devices like HTC vive and Oculus Rift. Before that, you need to check, if your PC is virtual reality ready. Software released by Oculus VR makes it easy to check the compatibility of your PC with Virtual Reality.

rift

Oculus VR has also printed a list of hardware requirement for your PC, so that you can use the Oculus Rift and experience the Virtual Reality games. The Rift headset makes it possible for everyone to experience the Virtual Reality, but to experience that, you need to make sure that your computer system is up to the mark.

Here, are the instructions for checking the Virtual Reality compatibility of your computer:

  1. You have to visit the oculus order page to find the compatibility tool, as it does not have its own website or webpage.
  2. Download the ‘Exe’ file of ‘Rift Compatibility tool for windows’ from the Oculus website.
  3. Open the file. Once the download is complete.
  4. Click on ‘start’. A window opens, where you find the start button in a box.
  5. This program shall analyze your system. On completion of the execution of the program, you will get the result. It will prompt you, if your PC is ready for VR or not. In case, your PC is not compatible; you may then have to upgrade your external graphics card or the processor.

Here is list of the minimum hardware requirement for Oculus Rift compatibility: 

  1. A graphics card equivalent to AMD 290/ NVIDIA GTX 970 or greater than these.
  2. A processor equivalent to Intel i5 (4590) 4th generation or greater than that.
  3. Memory or Ram of 8GB or more
  4. Video output of HDMI 1.3 or more
  5. Operating system of Windows SP1 or latest
  6. At least two USB 3.0 ports

[adinserter block=”7″]

As a technology lover you may like our daily important technology news series. It’s a playlist and you can retrieve the total day-wise videos. Please consider subscribing our YouTube channel:

Author: Technology and Beyond

Tagged : /

THIS is how to use offline Maps in Windows 10

We all rely on maps, so much, these days. It is very easy to find nearby locations and addresses with the help of maps. Windows 10’s user-friendly maps application has made it more convenient and easier for us to find locations with both speed and accuracy.

This app is a first party app by Microsoft. It worked in offline mode previously on window operating smart phones. Now Microsoft has taken it further by making it compatible with windows 10. This has resulted in the ultimate success of producing a universal map app for windows 10 compatible with PCs for every user.

Windows 10 offers user to download the maps as offline maps. With the help of offline maps one can navigate through even without having an access to Internet.

Follow the steps given below to download local maps in windows 10 for offline use:

  1. Select ‘Settings’ options from start menu.
  2. Click ‘System’ that is the very first option from the list.
  3. Select ‘offline maps’ and download it by selecting ‘download maps’ options.
  4. Select the area of that you need to browse, from different continents available. You can select multiple areas too. Make sure, you select small regions and download it, instead of selecting the entire range or continent as that may lead to heavy consumption and will hurt you, if you are on limited data scheme.
  5. Once you have selected the areas for which you want the map, click on the download option at the bottom of the screen to start the process.
  6. The downloading process may take a little time because of high incoming data. Be patient and wait for the download process to complete.
  7. You will be notified once the download it complete. You can now open the map applications after disabling your Internet.
  8. A list of the all places that you selected will be in front of you. Now you can easily make use of the maps to find places, directions, cities etc. that you were looking for.

You can now browse places, directions and different destinations in offline mode with the help of windows 10 maps application.

[adinserter block=”7″]

As a technology lover you may like our daily important technology news series. It’s a playlist and you can retrieve the total day-wise videos. Please consider subscribing our YouTube channel:

Author: Technology and Beyond

Tagged : /

Don’t get frustrated, you can speed up your Windows 10 machine like new with these simple tricks!

Are you facing speed and performance issues even after upgrading to windows 10? If your answer is yes, then you need to optimize your PC. Optimizing your PC means making some basic changes and modifications to make the best use of Windows 10. Little changes and modifications will increase the speed of starting and shutting down process.

Windows 10 provides a new interface and appearance making it interesting and adorable. Despite liking the Graphic User Interface and facilities, people in general, are often frustrated regarding the lack of speed.

More often than not, it has been observed that the problems related to lack of speed can be addressed simply by changing relevant settings in the concerned computer.   Follow the steps given below the speed up the basic functions of windows 10:

Get rid of unimportant an unnecessary auto-starters

0215-start-tab-100643301-orig

As soon as the booting process starts on switching on the PC, a lot of unwanted ground process becomes active within fraction of seconds. These unwanted processes slows down the booting process of windows 10 OS. Auto Starters are so big and memory hogging that they further reduce the speed and performance of OS even after the booting process is completed.

Right click on the task bar and select “Task manager option” to see and edit the list of start up processes. You can easily disable the programs that you do not want by simply right clicking on it and selecting the disable option.

Making a change in the power setting of the OS

3

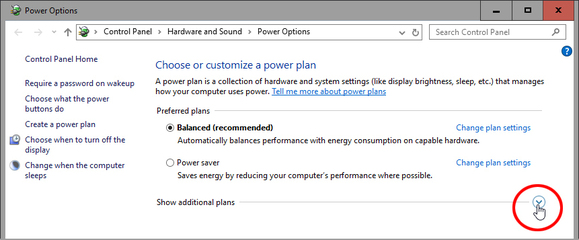
The default configurations of a laptop/ computer are made in a manner where the OS consume less power that results in slow processing of the OS. This happens as its performance functions are closed and disabled automatically because of its power saving mode. To enhance the processing, one needs to right click the start button and choose power options. Now on the control panel screen opened in front of you, select high performance from show additional plan option. This will definitely help the OS to work better and faster than before.

[adinserter block=”7″]

Next Page For More

Tagged : /

THIS cute little trick will convert your browser into a text editor!!

Notepad is an awesome software. But, often, we need to just jot down small one or two liners that we don’t intend to save. There is a simple way to do it in any browser while you are browsing various sites and doing some research.

All you need to do is type the following code into the browser’s URL bar:

Open chrome or Firefox browser

Type data:text/html, <html contenteditable> in the address bar. And hit return Key

You will see the cursor blinking on pressing the enter key.

This little trick uses the Data URI scheme and opens a simple HTML page with the element, “contenteditable.” After typing the content, if you decide to save it, just go ahead and press Ctrl+S and you will be able to save it as a HTML file. Otherwise also, it’s a cute way to brain dump your ideas which you need not necessarily save it!

You don’t have to remember this little line of code if you simply bookmark it for future access.

NOTE:

You can use this only as a text editor. You will get simple white canvas where you can type whatever you feel like. No formatting options or tools shall be available.

[adinserter block=”7″]

As a technology lover you may like our daily important technology news series. It’s a playlist and you can retrieve the total day-wise videos. Please consider subscribing our YouTube channel:


Author: Technology and Beyond

Tagged : /

Your Notepad can type automatically: Here is how to do ghost typing!

Everyone loves prank. Here we show an amazing notepad trick. This trick is known as Ghost Typing. Don’t get scared. Using this trick your notepad will type automatically.

Follow the steps given below:

Open Notepad.

Copy and paste the code given below in notepad.

Set wshshell = wscript.CreateObject(“WScript.Shell”) 
Wshshell.run “Notepad” 
wscript.sleep 400
wshshell.sendkeys “T”
wscript.sleep 100
wshshell.sendkeys “E”
wscript.sleep 120
wshshell.sendkeys “C”
wscript.sleep 200
wshshell.sendkeys “H”
wscript.sleep 100
wshshell.sendkeys “N”
wscript.sleep 140
wshshell.sendkeys “O”
wscript.sleep 100
wshshell.sendkeys “L”
wscript.sleep 50
wshshell.sendkeys “O”
wscript.sleep 120
wshshell.sendkeys “G”
wscript.sleep 170
wshshell.sendkeys “Y”
wscript.sleep 200
wshshell.sendkeys “ ”
wscript.sleep 100
wshshell.sendkeys “V”
wscript.sleep 50
wshshell.sendkeys “I”
wscript.sleep 120
wshshell.sendkeys “S”
wscript.sleep 160
wshshell.sendkeys “T”
wscript.sleep 200
wshshell.sendkeys “A”
wscript.sleep 100
wshshell.sendkeys “ / ”
wscript.sleep 100
wshshell.sendkeys “N”
wscript.sleep 100
wshshell.sendkeys “E”
wscript.sleep 100
wshshell.sendkeys “O”
wscript.sleep 100
wshshell.sendkeys “P”
wscript.sleep 100
wshshell.sendkeys “R”
wscript.sleep 100
wshshell.sendkeys “E”
wscript.sleep 100
wshshell.sendkeys “S”
wscript.sleep 100
wshshell.sendkeys “S”
wscript.sleep 100
wshshell.sendkeys “.”
wscript.sleep 100
wshshell.sendkeys “I”
wscript.sleep 100
wshshell.sendkeys “N”
wscript.sleep 100

Save the file as Technologvista.vbs
Note: While saving select Save as type  “All files”
Execute the saved File.

You will see “TECHNOLOGY VISTA/NEOPRESS.IN ” Typed Automatically.

If you liked this article, please share it with your friends and family. Also, let us know your personal experience regarding this in the comments below. 
[adinserter block=”7″]

As a technology lover you may like our daily important technology news series. It’s a playlist and you can retrieve the total day-wise videos. Please consider subscribing our YouTube channel:

Author: Technology and Beyond

Tagged : /

THIS is how to automatically load your favorite programs during Windows 10 startup

It’s a feeling of disappointment and distress when one turns on the laptop or desktop and it starts really slow because of a lot of unwanted programs. Windows 10 users are a little lazy about this, as they think it cannot be changed, because of system default. Well, there is good news, you can now disable unwanted programs from the task menu so that they don’t interrupt when the system boots. Working on the system will become easier as normal hang-ups will be eliminated.

However, you may feel like adding a few of your favorite programs in the favorite list. This will enable Windows 10 to start those programs during start-up. You can achieve that by adding these programs to the favorite list. If you follow the steps below, it is easy to do so:

0321-drag-from-start-100648339-orig

The first and foremost thing that you should do is to switch off the tablet mode, so that you are working only on desktop.

You need to open the start folder from the left side of the screen. When start folder is open, press winkey+R to get into the run window. Alternately, you may press the Tab key and hold the start button or simply right click on the soft start button to get the run menu.

While the Run window is open, “shell:startup” and it will bring up the startup folder on your desktop screen. Most probably, the folder will be empty as there are other methods available to autoload your favorite programs.

Creating shortcuts in the startup folder is easy. Just right click anywhere in the empty space and use New>Shortcut menu and follow the wizard and you will be done. This method may be a bit complicated for the newbies but regular users should not face any difficulty on that.

Another easy way is to use traditional drag and drop feature to add the icon in the startup folder. You need to press Control C in order to have icons in both the places (origin and destination folder). The icons may not be there on the desktop and in that case, just search out the folder where the icon exists.

Once you added the programs in the startup folder, the next time, when you boot your system, your favorite programs will be autoloaded along with the boot process.

[adinserter block=”7″]
As a technology lover you may like our daily important technology news series. It’s a playlist and you can retrieve the total day-wise videos. Please consider subscribing our YouTube channel:

Author: Technology and Beyond

Tagged : /

Get Rid of your Old Sluggish PC and Upgrade to a Faster Computer for Free

A New York City startup brings CloudReady for students to work on, instead of Macs and Windows PCs. This software is completely free for individual users. The machine will eventually be called a chrome laptop or chromium book but not chromebooks, as that name is trademark for laptops created by Google and its partners. This operating system is created to provide an amazing experience of working with all google apps and services without any interruption.

What is cloudReady?

CloudReady is an operating system developed by Neverware. It can make your computer function like a chromebook. It currently runs on basic ARM based chipset hardware. Since PC’s hardware is more powerful, one can easily experience this for free on a PC. It also has bunch of apps from Google like Google doc, sheets etc. There are a few drawbacks like, it doesn’t allow automatic updates on PCs and Mac manufactured since 2007. Also it cannot be dual booted with any other operating system. So, you need to make sure that you have a backup of all your important data.

Pre-Requirement

  1. A 8GB/ 16GB USB Drive which is the optimum size suggested by CloudReady.
  2. Chromebook Recovery Utility : This tool is required to create a USB based installation drive using the CloudReady software. It can be downloaded from here.
  3. CloudReady .bin file will be required during installation. The same can be downloaded from here.

cloudready-install1

Installation process

Once, you have fulfilled the requirement described above, you are ready to proceed with the installation. It has two distinct parts:

Next page For More

Tagged : /
Verified by ExactMetrics