You can create a spectacular mini volcano by dumping a bucket of dry ice in a pool

Having a pool party at your home? All drinks and music and games arranged? Then add one more thing to this party… a super cool pool trick that will surprise every one present there. This trick involves the use of dry ice so you will have to careful with that. For those who do not know what dry ice is, it is basically super-frozen carbon dioxide. It forms when carbon dioxide is exposed to extreme temperatures of at least -109° Fahrenheit, which causes it to change from a gas straight into solid which means it never passes through the liquid phase in between. So when you reverse the process, ice melts and directly becomes gas.

Popular YouTube person the Crazy Russian hacker has utilized the same properties of dry ice to tell you about an amazing trick via a video (the link of the video is given at the end of the article). He was toying with the idea of throwing dry ice into the pool and what would happen after that. So he proceeded to do just that. He dumped about thirty pounds of dry ice straight into the swimming pool. He started with one empty cooler, a pair of insulated gloves and a bunch of bags of dry ice. First he wore the gloves on and then broke the dry ice blocks into the cooler.

After doing all this, very carefully he picked up the cooler containing the 30 pounds of ice and dumped it straight into the pool. It produced an instant reaction. As soon as the dry ice came in contact with the warm water of the pool, it began to break down and melt the dry ice and produced a thick, white, dense fog that drifted up away in the breeze. The sight is just spectacular. Everyone is bound to love this once you do the trick.

The trick is sure to be a hit amongst your peers or family and it may seem dangerous too to some people, but this is not the case if you practice the most basic caution- wearing insulated gloves while handling it, otherwise you can have serious frost bites on your hands. Also while breaking the dry ice blocks you should wear protective eye wear. Other than that, you can have as much fun as you want with the trick. For a detailed view, refer the video below:

width="560" height="314" allowfullscreen="allowfullscreen">

[adinserter block=”7″]

As a technology lover you may like our daily important technology news series. It’s a playlist and you can retrieve the total day-wise videos. Please consider subscribing our YouTube channel:

Author: Technology and Beyond

Tagged : /

Some common iPhone problems that you can solve in a jiffy

Your iPhone is your status, your heart and not to forget your best friend because this is what keeps you connected to the world. But just like any other smartphone, it has its sets of problems. But if you know how to tackle these then you will not get irritated when you are stuck with one of the most common problems in an iPhone. So go ahead and sort them yourself…. With a little help from this post!

The screen just ‘froze’

iphone-3

We know…. This is one of the most annoying things but what can be done if it happens is what matters. First try to shut it off and on, and if that doesn’t work- hard reset the device. To hard reset the device, just hold on the home button and the power button at the same time for about 10 seconds until the Apple logo appears on the screen. But you have to be careful while doing this because this may result in loss of some data.

The low battery problem

iphone-2

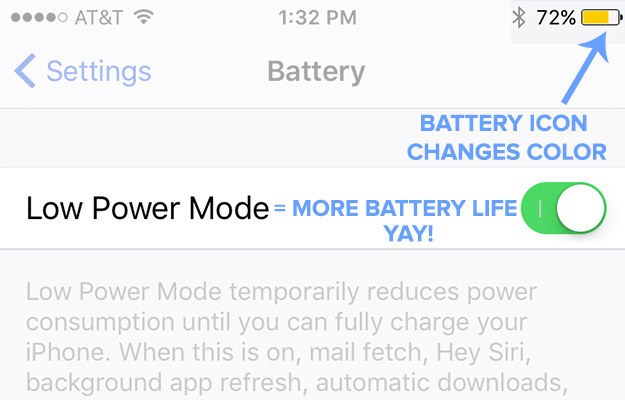
This one is also not something that the iPhone users don’t know about. You know the feeling of battery running out even before your day is over. In such situations, go to Settings>General>Battery and enable the Low Battery option followed by turning off the Battery Assist. In addition to this, go to Settings> Battery to see which apps are draining away your battery and shut them off.

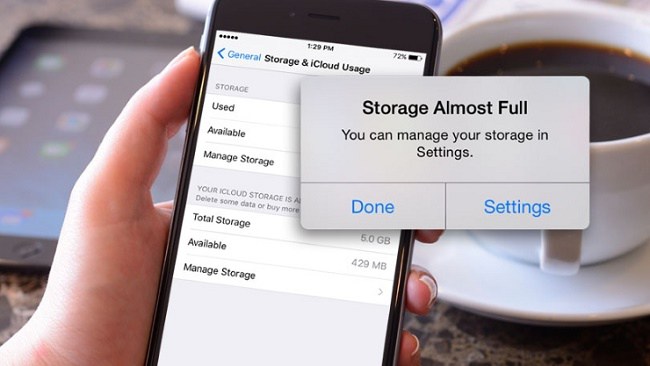
“The storage is almost full” caption

iphone-1

You know this if you are an iPhone user because iPhones like other   Android phones doesn’t have a memory card slot so you can’t extend its memory using one! So the best option is to buy the iPhone with 128GB storage. But if you have exhausted all your storage, you don’t need to panic. Just go to Settings>General>Storage>Manage storage and check what I causing the problem. Also, use Google Photos to store unlimited photos and videos to save that precious storage.

Next Page For More

Tagged : /

This is how you can create password protected folders without using any software

If more than one people use your device then securing personal files/software can be an issue.

Here is, how you can secure your files by creating a password for it.

Create a new ‘Text Document’ in a new folder, by right clicking and choosing new-> Text document.

Copy and paste this in the text document.

cls @ECHO OFF title Folder Private if EXIST “Control Panel.{21EC2020-3AEA-1069-A2DD-08002B30309D}” goto UNLOCK if NOT EXIST Private goto MDLOCKER :CONFIRM echo Are you sure you want tolock the folder(Y/N) set/p “cho=>” if %cho%==Y goto LOCK if %cho%==y goto LOCK if %cho%==n goto END if %cho%==N goto END echo Invalid choice. goto CONFIRM :LOCK ren Private “Control Panel.{21EC2020-3AEA-1069-A2DD-08002B30309D}” attrib +h +s “Control Panel.{21EC2020-3AEA-1069-A2DD-08002B30309D}” echo Folder locked goto End :UNLOCK echo Enter password to unlockfolder set/p “pass=>” if NOT %pass%== password here goto FAIL attrib -h -s “Control Panel.{21EC2020-3AEA-1069-A2DD-08002B30309D}” ren “Control Panel.{21EC2020-3AEA-1069-A2DD-08002B30309D}” Private echo Folder Unlocked successfully goto End :FAIL echo Invalid password goto end :MDLOCKER md Private echo Private created successfully goto End :End

Find ‘Password here’ in the above code and change it to the password of your choice.

Click on file->save as, save with the name of your choice, with .bat extension. For example, Secret.bat

Close note pad and go to the new folder, you will see a “SECRET” command.

Double click on this file, A new folder appears (Confidential or Private)

Transfer or move all the folders and files that you want to hide, and then go back one step

Double click on “SECRET” command again, a new dialogue box appears, just press ‘Y’ and click on enter.

The private/confidential folder will disappear, making all your files and documents secured.

To undo hiding, open the Secret folder command again and type the password. Click enter and the hidden folder will appear again.

[adinserter block=”7″]

As a technology lover you may like our daily important technology news series. It’s a playlist and you can retrieve the total day-wise videos. Please consider subscribing our YouTube channel:

Author: Technology and Beyond

Tagged : /

Having trouble with Window 10 password? These simple suggestions will help you!

There are now solutions to overcome the problems faced in Microsoft Windows 10 password. Microsoft has imposed strong security for PCs running windows 10. In spite of being convenient and good, it is also very risky. Even after careful installation of password in windows 10 most of the people tend to forget their password.

Forgetting password and trying to retrieve it, to access files and documents have become very common. There are several ways to recover the password of windows 10, but the whole process requires certain tools for installation and is also very time consuming.

If you feel that your password is difficult to type or remember, just change your password to something simple. Choosing a simple password will probably be risky, as online passwords are more prone to hacking than local ones. It should be complicated, long and difficult to guess. You should have alphabets that are lengthy, numbers that are complicated and use punctuations at intervals, so that, it becomes difficult in guessing. Make sure it is easy for you to remember the password. As soon as you come across such a password, visit microsoft.com. Log in to your account, and click on the avatar, which is in the upper right corner and select view account. Click to change password. Follow the instructions to change your password.

You will not require windows 10 password, while using a pin to log in. Although Microsoft password contains numbers, alphabets and punctuations, while pin contains only numbers, pin is still safe, as it does not travel to the Internet; hence there is no chance of hacking. Windows 10 pin is not restricted to 4 digits only; you can use as many digits you want. The longer the pin, the difficult it becomes to crack it. You can do this by selecting the ‘change account setting’ from the start menu and clicking on your avatar. Then select ‘sign-in’ options, click the add button in the pin section and follow the instructions given.

It is not necessary to have a Microsoft account to log in to windows 10. You will not be able to use certain features, like Cortana, if use a local account. To localize your account, you need to open ‘change account settings’ and select sign in with a local account instead.

[adinserter block=”7″]

As a technology lover you may like our daily important technology news series. It’s a playlist and you can retrieve the total day-wise videos. Please consider subscribing our YouTube channel:

Author: Technology and Beyond
Tagged : /

Here is the secret: Run Android Apps on any Chromebook

Google recently announced its very first developer preview with Android app for Chromebook. But, the chrome OS update is available only for Asus Chromebook flip. Devices like Google Chromebook Pixel and Acer Chromebook R11 can expect to get the update next, whereas other Chromebook users might have to for little more time.

Google’s latest timeline reveal that other Chromebooks will have to wait till late this year or early next year to get the play store built. However, if you’re impatient, there are ways you can run the Android apps on Chromebook. You will have to use the ARC Welder app to run Android on Chrome OS. Follow the steps given below to use Android apps on any Chromebook through ARC Welder.

Step 1

ARC-Welder-Chrome-app

Download the ARC wielder app from Chrome Web Store.

Step 2

Download the APK files of apps that you want to use on your Chromebook from APKMirror.com

Step 3

ARC-Welder-select-APK

Open the ARC Wielder app and then click on the Add your APK option.

Step 4

Select the APK files that you have downloaded.

Step 5

ARC-Welder-test-Android-app-on-Chromebook

Once the APK files are loaded in the app, you can choose from various options and customize your app experience. For example you can select the orientation (portrait or landscape), form factor (tablet, phone, maximized or full screen) and you can choose to give the app “Clipboard access” or not. Once done, click on “Test” to start the app.

Step 6

Android-apps-running-on-Chrome-OS-2

In case you have loaded ARC Welder app previously then you will be prompted to remove it before loading the new APK. Your app will then start up and you can use the app through mouse or touch if your Chromebook supports it. 

Important Points to Note

The ARC Welder app is built for the developers trying to enhance their Android apps for the Chrome OS, so do not assume great performance out of it. Nevertheless, if you are just considering using a few Android apps on your Chromebook, it’s not too shabby either. Having said that, if you consider using ARC Welder permanently, here are a few important points to be kept in mind:

  • Have patience as it many take a little longer time to load after you have clicked test.
  • According to developers, you should useTablet or Maximized as the form factor and Landscape as the screen orientation for best results. You can resize the window of an app, like you would do on a normal app and the interface will scale accordingly.
  • Not all the apps work! We tried out the APKs of most of the popular apps and only a few managed to play well with Chrome OS. This should get fixed with future Chrome OS updates, as Google starts integrating its Play Services.
  • You should choose downloading stable versions of apps, rather than trying out any beta or alpha builds of an app.

Now, you are ready to try out Android apps on your Chromebook.

[adinserter block=”7″]

As a technology lover you may like our daily important technology news series. It’s a playlist and you can retrieve the total day-wise videos. Please consider subscribing our YouTube channel:

Author: Technology and Beyond
Tagged : /

THIS is how you can use multiple WhatsApp, Facebook, Snapchat accounts on Android!

Twitter, Gmail, Instagram etc. allows you to login with multiple accounts and also switch with ease, whereas most of the other apps don’t. It becomes easy when you have a definite way to use multiple accounts, especially, for messaging apps like Whatsapp. We tend to use different numbers for work and personal usage and therefore, if we have an ability to distinguish our Whatsapp accounts as well, it would be great. Most of us love using different accounts especially for games. With an android app called Parallel Space, you can now login to multiple accounts using a single app in two iterations separately. This app also allows you install apps in incognito mode, which means that those apps will be only be available in Parallel Space app and no where else.

Here is how to use Parallel Space to run multiple iterations of an app.

Step 1

Parallel-Space-Welcome

Install the app “Parallel Space” from the Play Store. Open the app and you will see cool slides making you aware about the usefulness of the app. Tap on start.

Step 2

Parallel-Space-clone-apps

Clone apps page is your starting point from where you can make a selection of the app you want to run in Parallel Space. Mostly all the apps on your device are supported. For example, Select Whatsapp and it will be shown in Parallel Space with a message “Tap to open WhatsApp and sign in your other second account”.

Step 3

Parallel-Space-use-two-WhatsApp-accounts

Now you can easily sign into a second account on opening the app. You can easily add more apps and run multiple accounts.

Not only does Parallel Space allows you to run multiple iterations of an app, but also brings separate notifications of the cloned apps, this includes notifications from play services and play store as well. You have an option to block notifications from apps or put them in DND mode. Cloned apps can also be added to the home screen in order to use both your iterations of an app easily.

Parallel-Space-cloned-apps-notifications

Note: You can only add a single clone of the apps installed on your device, which means you can only use two accounts of an app. 

MultiDroid, claimed to be the first app virtualization system which powers Parallel Space Android and thus, it runs as its own entity in Android. Here are few more features it gives us along with cloning app.

[adinserter block=”7″]

Next Page For More

Tagged : /

This is how to use YouTube as a free screen video recorder!

YouTube has some amazing tricks up its sleeve including a built-in video editor and tools hiding your face or particular object as such. One of the great feature of YouTube is that you can use YouTube site to record anything on your computer screen. From showing off an app or to teaching grandparents to use Skype.

Just go to YouTube’s beta live streaming page and click enable live streaming. Complete the verification process and click to create live event thereafter. Please note that your video will be NOT be broadcasted without your permission.

Name your screencast and select from Private (specific people have access) or Unlisted (anyone with a specific URL has access) from the drop-down list on the right. Click Go live now once you are ready.

At this point, YouTube demands access to the webcam and microphone on your computer that can be later toggled on or off.

Click on the Screenshare icon (White arrow on Green background) on the hangout window and select the entire screen or one of the windows that is currently open.

Click on Share and you are ready. Use Start broadcast option to begin recording and Stop broadcast option to stop. Go back to YouTube to see and share your saved video.

[adinserter block=”7″]

As a technology lover you may like our daily important technology news series. It’s a playlist and you can retrieve the total day-wise videos. Please consider subscribing our YouTube channel:

Author: Technology and Beyond

Tagged : /

The easiest way to reclaim crazy amount of space on your iPhone

Follow the steps given below to clear out tons of space on your iPhone quickly and easily.

Step 1

See how much free space is available for on your device. To do this you need go to settings->General->Usage->iCloud storage and space.

This way you can check the storage that is available for you.

Step 2

Visit iTunes store and choose a movie the size of which should be greater than the free available space. For example, choose lord of the rings and hit “Rent” Twice.

Step 3

Once you receive a message saying that you do not have enough space available. Return to settings again. You will notice that you have more space available. Repeat the process to get more free space. Make sure you do not rent the movie if you have enough space available.

This works because iPhone clears all the cache and other data from the app to make space.

[adinserter block=”7″]

As a technology lover you may like our daily important technology news series. It’s a playlist and you can retrieve the total day-wise videos. Please consider subscribing our YouTube channel:

Author: Technology and Beyond
Tagged : /

THIS is how you install a new memory in your PC

Turning your old computer into a reasonably speedy one is a real possibility. Today’s generation is getting very much accustomed with the new vibrant technologies including laptops, computers and Internet. With computer, came the abundance of software. Currently software like Photoshop, Skype, Dropbox and Web browsers like Chrome/ Safari etc. are must for the users.


These software runs on RAM while the sessions are in process.


Often, 2 to 4 GB of RAM makes it difficult for your computer to run with many essential software. You need to increase your RAM if your PC is finding it difficult to run because of the presence or usage of large number of software.


In today’s context, 4GB is suggested if the computer’s performance requirement is very gentle, but an 8 GB is advised if you are a heavy software user, however 16GB is a superlative option.


Various kinds of RAM’s are available in the market, like, DDR4, DDR2, and DDR3 etc. DDR2 and DDR are older versions of RAM, whereas DDR3 rules the market today. There are different brands of RAM are available for purchase, like, Kingston, Corsair, G.Skill etc. You must keep in mind the design of RAM’s heat sink when selecting a brand. The other important feature to be considered is the speed and memory kit capacity of the RAM. Clock speed should be from 1600HZ to 1866HZ for DDR3 RAM.


Follow the steps below to install new memory in your Personal Computer


Step 1


Shut down your PC and disconnect all the connected cables. Take out the motherboard by opening the CPU.


Step 2


There are four memory slots next to the big heat sink. RAM slots are adjacent to the CPU socket.


Step 3


Remove the old Ram by removing the plastic latch aside of it. Also, remove any dust present on the RAM slot.


Step 4


Now place the new RAM in the slot so that every small socket in the RAM get filled with the slots, you can also read the Motherboard manual, if required. Now lock the RAM with the plastic latch.


Step 5: 

Now put back the PC case and connect all the cables and turn on your PC.


Sometimes the system might take few restarts to adopt your newly introduced memory. So keep calm and have patience. You can use the same steps for any RAM.

width="560" height="314" allowfullscreen="allowfullscreen">

[adinserter block=”7″]

As a technology lover you may like our daily important technology news series. It’s a playlist and you can retrieve the total day-wise videos. Please consider subscribing our YouTube channel:

Author: Technology and Beyond


Tagged : /

How Internet is accessed from the International Space Station (ISS)?

International Space Station (ISS) is a matter of pride for us- human beings as it is the important link between the space and the Earth. But doesn’t it occur to you that while we struggle with our internet signals once we reach a remote or distant location, how do people on International Space Station have access to it and that too without any glitch? Isn’t the space station a remote and distant location? If you delve deep, you will find that the ISS’s internet access is quite interesting.

internet

The basic problems in setting up internet in space are the inability to run a fibre-optic cable from ground to space and a planetary scale Wi Fi is still no less than a dream. This is the reason why the majority of communication with the ISS happens with the help of radio waves.

Radio is quite easy to set up (needing just an antenna and a transmitter) and an easy and straightforward way of broadcasting information. In addition to this, the atmosphere doesn’t block radio waves so the signals don’t get absorbed mid-way. Radio waves are the way we communicate with most of our satellites. The radio frequencies used for the space station communication are different from what we use in our cars. A GPS satellite for instance uses the ‘L band’ frequency range of 1 GHz to 2 GHz.

The radio connection to the ISS isn’t L-band, it’s Ku band (12-18 GHz) and S band (2-4 GHz), but the principle is the same. We can beam a signal up to the ISS, which has an antenna which lets them receive it, and then their computers can download an email.

[adinserter block=”7″] 

Next Page For More

Tagged : /

This is HOW you can access another computer from your own computer!

How wonderful it would be if you could access your important work files from your office computer while being at your home? You may be surprised but it is possible. You can even get a technician to control your home computer screen even if he is sitting in his office. Many ways to do this exist, a few of them are listed below. Hope you find them worth your time!

Method 1: Windows Remote Desktop

maxresdefault

For this method, you need to be connected to the computer you want to access via the same shared network. This can be done by connecting both to the same wifi or through a VPN. You also need to enable ‘Remote Desktop’ on the computer you want to have access to. For this:

  • Click Start->Control Panel->System and Security->System. Or you can press Windows key + Pause key.
  • Select the ‘Remote Settings’ link on the left side.
  • Tick the ‘Allow remote connections to this computer’ checkbox. If you wish to change some of the advanced options, you may do so under the ‘Advanced’ button.

Now, choose the users you want to allow access to the computer. This can be done by clicking on the ‘Select Users’ button and then selecting the ‘Add’ button.

You also need to know the system name so that you can find it to connect. Press Windows key+pause. The name will be found in the ‘Computer name’ entry.

Make sure the computer is not in the Sleep mode. To disable it :

  • Go to Control Panel->Power Options.
  • Click on ‘Change plan settings’ link.
  • Set Sleep and Hibernate to Never and save the changes.

Now, start the computer you want to connect to the remote computer. Choose Start and search for ‘remote desktop connection’. Open it.

  • Type the system name of the computer that you want to connect to.
  • Type your username.
  • Use ‘Show Options’ to change the advanced options for this connection.
  • Click on Connect. Once you are connected, the other computer’s desktop screen will appear on your computer in a different window. You can control it normally.

To connect to your remote computer over the internet, open port 3389 on the firewall of the remote computer. It is advised to have a very secure password because this exposes your desktop to the internet. After opening ports, enter the public IP address of the computer to connect to it.

You can also use the official Microsoft app to connect with Windows 8 or 8.1 Professional desktops. You just have to configure Remote Desktop on the computer.

[adinserter block=”7″]

Next page For More

Tagged : /

How to stay safe when you are using public wifi!

Today when you step out, you will surely come across many public wifi hotspots. And come on, who doesn’t love free wifi on the go? But you need to beware of the risks involved. Read on to know all about using free public wifi:

airportwifi

Read the terms and conditions carefully

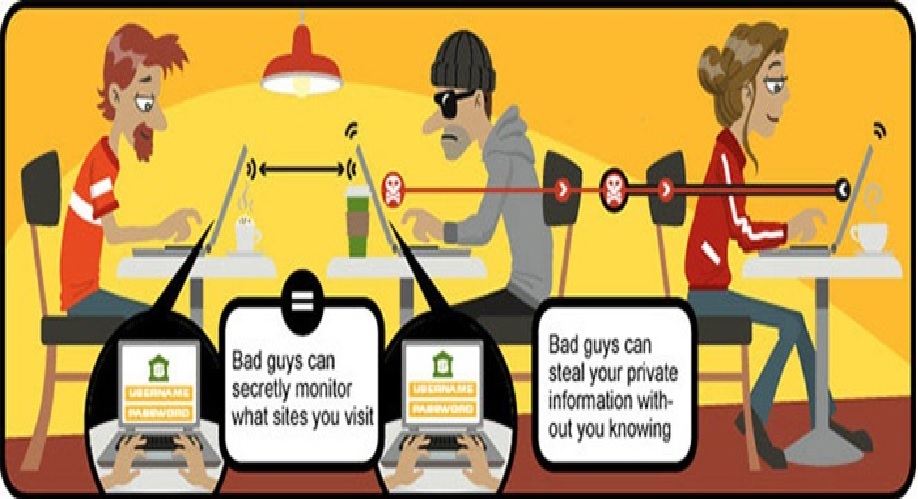
In the haste of getting access to the internet, many people click on anything that appears on the screen. These might put them in a lot of trouble. Always ensure to double check what you’re signing up for. Make it a point to read the terms and conditions. Decide carefully if its worth to give the information it is demanding for. You can use an alternative email address if you have, in these times. Another important point is to always connect to official wifi networks that are properly advertised. Many a times, hackers set up free wifi hotspots to catch vulnerable citizens. Do take a note that you don’t fall prey to such traps!

Stick to secure websites and apps

Think a lot when you are about to do something very important over a public wifi. In such networks, it is very easy for anyone on the same network to access your data.  When connecting your phone to the network, try to use a browser than an app. Apps can generally accept fake security information without your knowledge. This can create a mess for you if you are buying stuff online or using net banking. Browsers are much more secure for checking and verifying HTTPS connections. Furthermore, using apps from famous and well-known names will reduce the risk on public wifi although none will provide you a guarantee.

Install a VPN app

VPNs (virtual private networks) redirect your data through trusted and dedicated servers. You can either pay for a reputable VPN service or go for a well established free one. Most of them are available as apps for desktop and mobiles, and they are easy to install and use. This is the really effective way of securing your connections over public networks. Some of the highly recommended VPNs are IPVanish, CyberGhost, Hotspot Shield and Private Internet Access. Also, Opera’s mobile browser has a built-in VPN.

[adinserter block=”7″]

Next Page For More

Tagged : /

Forgot your computer password? Don’t worry! This is how you can still access!

Imagine that you need to access some important files on your computer and you cant log in to your computer just because you don’t have the password, seems horrifying, eh? Don’t worry and check out these easy hacks to access your PC without your password!

AAEAAQAAAAAAAAJdAAAAJDkzNjc4ODk1LWI1NTYtNGFiNi05MTViLWE1ZjY5ZmJmYTZkMw

Method 1 : Change your Windows 8 or 10 Password Online

On a different computer, visit https://account.live.com/resetpassword.aspx. Select “I forgot my password” on the page that opens and click “Next”.

Note that this method will only work if you have a Microsoft account and use it to log into your computer.

Enter your Microsoft account email address. Don’t forget to write the entire email address along with the domain name. In the box below, type the verification code and click “Next”.

Select an appropriate option to receive the password reset code. The options will include the phone number and non-Microsoft recovery email address. Choose either of them and click “Send Code”. You may click to “I don’t have any of these” if that’s the case and below that option, type an accessible e-mail address and click “Next”.

In case, you received the code via your recovery email address or phone number, you can enter the code and click next to reset the password. You can login with your Microsoft account once you confirm your new password. If that was not the case, then you’ll be directed to a form that will verify your identity, try to provide as much relevant information as you can including your old passwords. Microsoft will verify and send you the password reset link on the email address provided.

Method 2: Change your Windows 8 or 10 Password in Safe Mode

Click on the Power icon on the login screen, hold down the shift key and press “restart” along with it.

When the computer restarts, choose “troubleshoot” then “advanced options” then “Startup Settings” and then click “Restart”.

Press 4 or F4 to enter the Safe Mode. You will be taken to a ‘Safe Mode’ login screen.

Login as “Administrator”. You don’t have to enter any password.

Press the ‘Windows’ icon + X, click “control panel” and then “user accounts”.

Select “Manage other accounts”. Now choose your user account to change its password.

Change the password and save it.

Press ctrl+alt+del, then click Power icon and then “Restart”. Now you can login normally with your new password.

[adinserter block=”7″]

Next page For More

Tagged : /

THIS is How you can access tour computer from your Smartphone

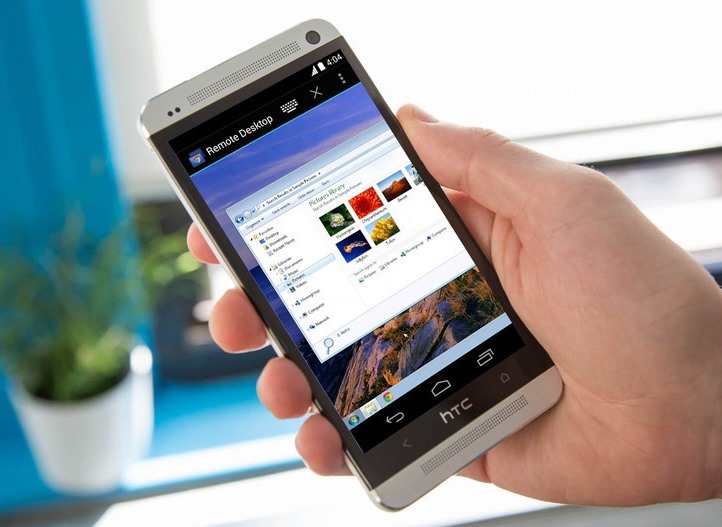
Yes, you read it right! Now you can access your computer with an iPhone as if you are sitting in front of it. The two methods described here work the best and they are free to use too. Let’s have a look at them.

11

Method 1: Using TeamViewer

Install TeamViewer on your iPhone from the AppStore. This app provides support to technicians who make changes your computer over long distances.

Open the app and create a new account by providing your name, email address and a password for your account.

Install the TeamViewer app on your computer using teamviewer.com/en/download/. The two apps will work together to provide a safe control.

Open the TeamViewer app on the computer. Click on ‘computers & contacts’ at the bottom of the screen. In the window that comes up, login using your TeamViewer account details. Minimise TeamViewer, it will run automatically now.

For extra security, set up a personal password by clicking on Extras >> Options >> Security in the TeamViewer app on each computer you want to control.

Now everything is set and you can control you computers from your iPhone in the same way as you do when sitting in front of the computer.

  • Login to the TeamViewer app on your iPhone.
  • Click the Computers icon at the bottom of your screen, and log into your account.
  • Click the My Computers icon to view a list of all the computers.
  • Click the icon next to the computer you want to control. The icon has two arrows in opposite directions.
  • Enter the Personal Password for the computer you want to control.
  • Click the keyboard icon at the bottom right of your screen to access zoom, settings, and a virtual keyboard.
  • Access files, programs, and operate your computer with touch commands as if you were sitting in front of it.
  • To close the connection, click the X icon on the lower left.

[adinserter block=”7″]

Next Page For More

Tagged : /

THIS is how you can turn Chrome into a personal language tutor!

Learning new languages are in trend now. People now, want to be fluent in more than one language. Even schools and colleges encourage learning a new language and they have mostly included this in their curriculum. There are several exercises, which are practiced for learning a new language like, listening to radios, watching TV, reading etc. To be perfect, you have to inculcate such lessons in everyday.

Google has this habit of coming out with new apps every day for different purposes, Google, recently, came out with another interesting new app, ‘’, which helps people learn new languages easily and quickly.

To use this app perform the steps given below carefully.

  1. Download and install the app for chrome
  2. Open the app by clicking on the icon, which appears on the ride side of the address bar
  3. Select the language you want to learn
  4. Select the fluency level; you can rate yourself from novice to fluent

Now on visiting any website, you will see words and phrases highlighted and translated to the language you want to learn. You must be careful in checking out the portion that has been translated for building your vocabulary. In case, you are still finding it difficult, click on the translated word and it will be converted back to English. Click again to change it your targeted language.

You can also hear the translated portion using ‘Google Translate’. The app also allows you to make significant setting with Google Translate website, which automatically translates the word into your chosen language.

While you are a novice, only few sentences are translated into the chosen language. The number of translated portions increases with time. The entire paragraph is changed into the chosen language when you select fluent as your option. You can close the app by clicking the icon again and selecting the off option.

Although, translated websites are not perfect always, but its utility depends on how you would like to use the Google translate. Occasionally, you may see spelling mistakes as well, but they are trying to bring remarkable solutions for those, who need assistance in learning and practicing a new language, in their daily routine.

[adinserter block=”7″]

As a technology lover you may like our daily important technology news series. It’s a playlist and you can retrieve the total day-wise videos. Please consider subscribing our YouTube channel:

Author: Technology and Beyond

Tagged : /
Verified by ExactMetrics