Should you safely eject or simply pull out USB drives?

Most of us just pull a flash drive out, instead of safely removing it. Operating Systems treat the disks as objects, which can be trusted to not change the state suddenly.

6984516173_1fe5df5693_k_web_1024

The OS expects the files to remain accessible, while reading or writing, and, not suddenly disappear in the middle of the process.

There are two answers to whether you should eject a flash drive or not.

A short answer to this is yes one should always eject a drive before removing it. Mac and Linux will provide you a way to eject a drive always, but sometimes windows do not have an eject option for selected drives. On Windows select the “Safely remove hardware” option from the system tray and select the drive you want to remove.

A long answer to this is, that in windows, one can remove a flash drive without ejecting sometimes.

Here is a bit more of information on how computers actually deal with USB drives.

Why computers want you to eject drives?

Removing out a drive, while it is being written can corrupt the data. However, even though the drive isn’t actively being written to, it can still corrupt the data. Most of the OS uses write coaching to get better performance out of your computer.

While you write a file to another drive, for example, a flash drive, the OS waits to actually perform that action, till it has a number of requests to complete. It then completes all of them together. Clicking on eject button, tells your OS to flush the cache, which means it makes sure that all pending actions have been performed. You can safely unplug the drive now without any data corruption.

[adinserter block=”7″]

Next Page For More

Tagged : /

Exclusively for you: THIS is how to use the headphone as iPhone Camera Remote

Most of the time, the iPhone’s camera app shutter button is inconvenient for clicking pictures, especially, if you are operating it with one hand. As an alternative, you can always use the volume button of the phone to click pictures.

iphone-headphones-as-camera-shutter-remote

But, there is yet another way to click a picture, which most of the users are not aware of.

This trick has been around for years, yet you might have not tried it. The two volume buttons on your iPhone headphones can act as shutter button to click pictures.

You can click pictures with one hand and keep the phone upward with the other. This works for videos as well. You can use the headphones as a wired remote.

It might save you from the hassles of juggling with your phone in awkward situations.

[adinserter block=”7″]

As a technology lover you may like our daily important technology news series. It’s a playlist and you can retrieve the total day-wise videos. Please consider subscribing our YouTube channel:

Author: Technology and Beyond

Tagged : /

While Virtual Reality is coming in a big way, check, if your PC is ready for it!

Virtual reality is coming faster than anyone thought. The time is not far when you will be able to enjoy games on computer and other programs in 3D with devices like HTC vive and Oculus Rift. Before that, you need to check, if your PC is virtual reality ready. Software released by Oculus VR makes it easy to check the compatibility of your PC with Virtual Reality.

rift

Oculus VR has also printed a list of hardware requirement for your PC, so that you can use the Oculus Rift and experience the Virtual Reality games. The Rift headset makes it possible for everyone to experience the Virtual Reality, but to experience that, you need to make sure that your computer system is up to the mark.

Here, are the instructions for checking the Virtual Reality compatibility of your computer:

  1. You have to visit the oculus order page to find the compatibility tool, as it does not have its own website or webpage.
  2. Download the ‘Exe’ file of ‘Rift Compatibility tool for windows’ from the Oculus website.
  3. Open the file. Once the download is complete.
  4. Click on ‘start’. A window opens, where you find the start button in a box.
  5. This program shall analyze your system. On completion of the execution of the program, you will get the result. It will prompt you, if your PC is ready for VR or not. In case, your PC is not compatible; you may then have to upgrade your external graphics card or the processor.

Here is list of the minimum hardware requirement for Oculus Rift compatibility: 

  1. A graphics card equivalent to AMD 290/ NVIDIA GTX 970 or greater than these.
  2. A processor equivalent to Intel i5 (4590) 4th generation or greater than that.
  3. Memory or Ram of 8GB or more
  4. Video output of HDMI 1.3 or more
  5. Operating system of Windows SP1 or latest
  6. At least two USB 3.0 ports

[adinserter block=”7″]

As a technology lover you may like our daily important technology news series. It’s a playlist and you can retrieve the total day-wise videos. Please consider subscribing our YouTube channel:

Author: Technology and Beyond

Tagged : /

THIS is how to use offline Maps in Windows 10

We all rely on maps, so much, these days. It is very easy to find nearby locations and addresses with the help of maps. Windows 10’s user-friendly maps application has made it more convenient and easier for us to find locations with both speed and accuracy.

This app is a first party app by Microsoft. It worked in offline mode previously on window operating smart phones. Now Microsoft has taken it further by making it compatible with windows 10. This has resulted in the ultimate success of producing a universal map app for windows 10 compatible with PCs for every user.

Windows 10 offers user to download the maps as offline maps. With the help of offline maps one can navigate through even without having an access to Internet.

Follow the steps given below to download local maps in windows 10 for offline use:

  1. Select ‘Settings’ options from start menu.
  2. Click ‘System’ that is the very first option from the list.
  3. Select ‘offline maps’ and download it by selecting ‘download maps’ options.
  4. Select the area of that you need to browse, from different continents available. You can select multiple areas too. Make sure, you select small regions and download it, instead of selecting the entire range or continent as that may lead to heavy consumption and will hurt you, if you are on limited data scheme.
  5. Once you have selected the areas for which you want the map, click on the download option at the bottom of the screen to start the process.
  6. The downloading process may take a little time because of high incoming data. Be patient and wait for the download process to complete.
  7. You will be notified once the download it complete. You can now open the map applications after disabling your Internet.
  8. A list of the all places that you selected will be in front of you. Now you can easily make use of the maps to find places, directions, cities etc. that you were looking for.

You can now browse places, directions and different destinations in offline mode with the help of windows 10 maps application.

[adinserter block=”7″]

As a technology lover you may like our daily important technology news series. It’s a playlist and you can retrieve the total day-wise videos. Please consider subscribing our YouTube channel:

Author: Technology and Beyond

Tagged : /

Don’t get frustrated, you can speed up your Windows 10 machine like new with these simple tricks!

Are you facing speed and performance issues even after upgrading to windows 10? If your answer is yes, then you need to optimize your PC. Optimizing your PC means making some basic changes and modifications to make the best use of Windows 10. Little changes and modifications will increase the speed of starting and shutting down process.

Windows 10 provides a new interface and appearance making it interesting and adorable. Despite liking the Graphic User Interface and facilities, people in general, are often frustrated regarding the lack of speed.

More often than not, it has been observed that the problems related to lack of speed can be addressed simply by changing relevant settings in the concerned computer.   Follow the steps given below the speed up the basic functions of windows 10:

Get rid of unimportant an unnecessary auto-starters

0215-start-tab-100643301-orig

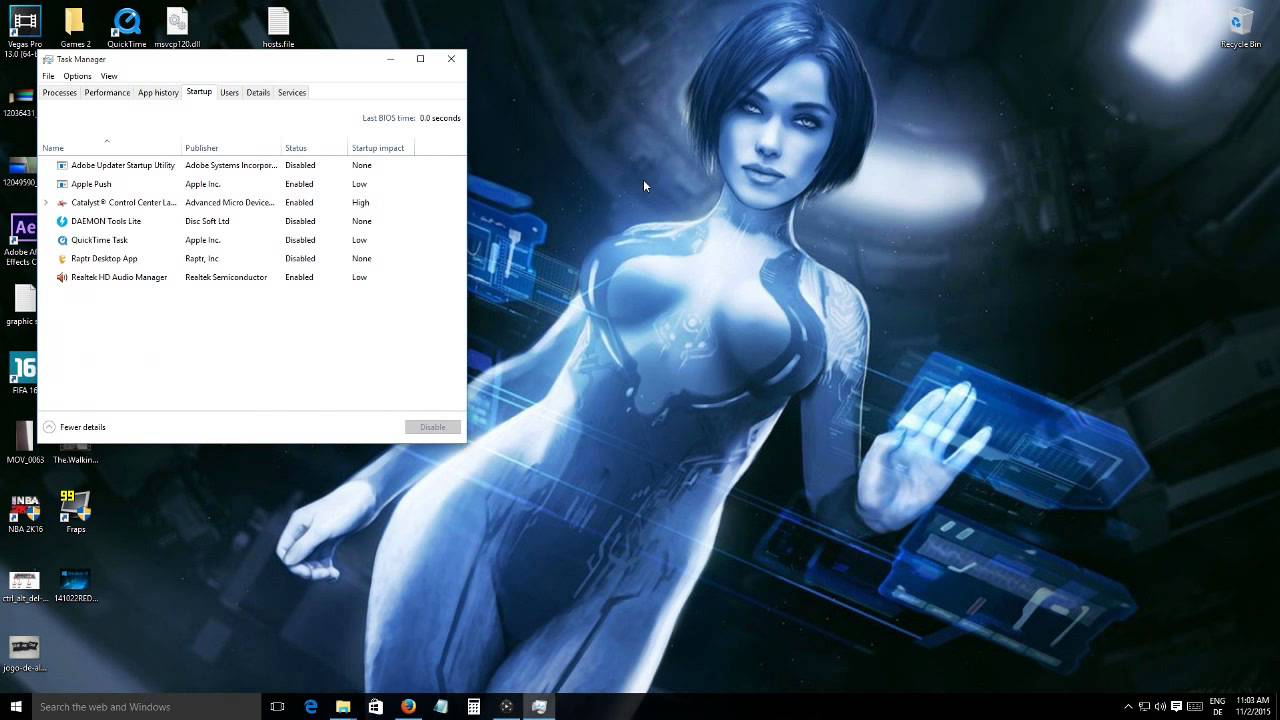
As soon as the booting process starts on switching on the PC, a lot of unwanted ground process becomes active within fraction of seconds. These unwanted processes slows down the booting process of windows 10 OS. Auto Starters are so big and memory hogging that they further reduce the speed and performance of OS even after the booting process is completed.

Right click on the task bar and select “Task manager option” to see and edit the list of start up processes. You can easily disable the programs that you do not want by simply right clicking on it and selecting the disable option.

Making a change in the power setting of the OS

3

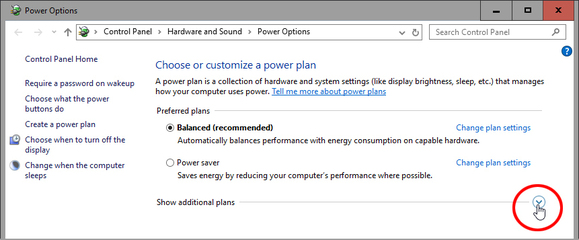
The default configurations of a laptop/ computer are made in a manner where the OS consume less power that results in slow processing of the OS. This happens as its performance functions are closed and disabled automatically because of its power saving mode. To enhance the processing, one needs to right click the start button and choose power options. Now on the control panel screen opened in front of you, select high performance from show additional plan option. This will definitely help the OS to work better and faster than before.

[adinserter block=”7″]

Next Page For More

Tagged : /

THIS cute little trick will convert your browser into a text editor!!

Notepad is an awesome software. But, often, we need to just jot down small one or two liners that we don’t intend to save. There is a simple way to do it in any browser while you are browsing various sites and doing some research.

All you need to do is type the following code into the browser’s URL bar:

Open chrome or Firefox browser

Type data:text/html, <html contenteditable> in the address bar. And hit return Key

You will see the cursor blinking on pressing the enter key.

This little trick uses the Data URI scheme and opens a simple HTML page with the element, “contenteditable.” After typing the content, if you decide to save it, just go ahead and press Ctrl+S and you will be able to save it as a HTML file. Otherwise also, it’s a cute way to brain dump your ideas which you need not necessarily save it!

You don’t have to remember this little line of code if you simply bookmark it for future access.

NOTE:

You can use this only as a text editor. You will get simple white canvas where you can type whatever you feel like. No formatting options or tools shall be available.

[adinserter block=”7″]

As a technology lover you may like our daily important technology news series. It’s a playlist and you can retrieve the total day-wise videos. Please consider subscribing our YouTube channel:


Author: Technology and Beyond

Tagged : /

Your Notepad can type automatically: Here is how to do ghost typing!

Everyone loves prank. Here we show an amazing notepad trick. This trick is known as Ghost Typing. Don’t get scared. Using this trick your notepad will type automatically.

Follow the steps given below:

Open Notepad.

Copy and paste the code given below in notepad.

Set wshshell = wscript.CreateObject(“WScript.Shell”) 
Wshshell.run “Notepad” 
wscript.sleep 400
wshshell.sendkeys “T”
wscript.sleep 100
wshshell.sendkeys “E”
wscript.sleep 120
wshshell.sendkeys “C”
wscript.sleep 200
wshshell.sendkeys “H”
wscript.sleep 100
wshshell.sendkeys “N”
wscript.sleep 140
wshshell.sendkeys “O”
wscript.sleep 100
wshshell.sendkeys “L”
wscript.sleep 50
wshshell.sendkeys “O”
wscript.sleep 120
wshshell.sendkeys “G”
wscript.sleep 170
wshshell.sendkeys “Y”
wscript.sleep 200
wshshell.sendkeys “ ”
wscript.sleep 100
wshshell.sendkeys “V”
wscript.sleep 50
wshshell.sendkeys “I”
wscript.sleep 120
wshshell.sendkeys “S”
wscript.sleep 160
wshshell.sendkeys “T”
wscript.sleep 200
wshshell.sendkeys “A”
wscript.sleep 100
wshshell.sendkeys “ / ”
wscript.sleep 100
wshshell.sendkeys “N”
wscript.sleep 100
wshshell.sendkeys “E”
wscript.sleep 100
wshshell.sendkeys “O”
wscript.sleep 100
wshshell.sendkeys “P”
wscript.sleep 100
wshshell.sendkeys “R”
wscript.sleep 100
wshshell.sendkeys “E”
wscript.sleep 100
wshshell.sendkeys “S”
wscript.sleep 100
wshshell.sendkeys “S”
wscript.sleep 100
wshshell.sendkeys “.”
wscript.sleep 100
wshshell.sendkeys “I”
wscript.sleep 100
wshshell.sendkeys “N”
wscript.sleep 100

Save the file as Technologvista.vbs
Note: While saving select Save as type  “All files”
Execute the saved File.

You will see “TECHNOLOGY VISTA/NEOPRESS.IN ” Typed Automatically.

If you liked this article, please share it with your friends and family. Also, let us know your personal experience regarding this in the comments below. 
[adinserter block=”7″]

As a technology lover you may like our daily important technology news series. It’s a playlist and you can retrieve the total day-wise videos. Please consider subscribing our YouTube channel:

Author: Technology and Beyond

Tagged : /

THIS is how to automatically load your favorite programs during Windows 10 startup

It’s a feeling of disappointment and distress when one turns on the laptop or desktop and it starts really slow because of a lot of unwanted programs. Windows 10 users are a little lazy about this, as they think it cannot be changed, because of system default. Well, there is good news, you can now disable unwanted programs from the task menu so that they don’t interrupt when the system boots. Working on the system will become easier as normal hang-ups will be eliminated.

However, you may feel like adding a few of your favorite programs in the favorite list. This will enable Windows 10 to start those programs during start-up. You can achieve that by adding these programs to the favorite list. If you follow the steps below, it is easy to do so:

0321-drag-from-start-100648339-orig

The first and foremost thing that you should do is to switch off the tablet mode, so that you are working only on desktop.

You need to open the start folder from the left side of the screen. When start folder is open, press winkey+R to get into the run window. Alternately, you may press the Tab key and hold the start button or simply right click on the soft start button to get the run menu.

While the Run window is open, “shell:startup” and it will bring up the startup folder on your desktop screen. Most probably, the folder will be empty as there are other methods available to autoload your favorite programs.

Creating shortcuts in the startup folder is easy. Just right click anywhere in the empty space and use New>Shortcut menu and follow the wizard and you will be done. This method may be a bit complicated for the newbies but regular users should not face any difficulty on that.

Another easy way is to use traditional drag and drop feature to add the icon in the startup folder. You need to press Control C in order to have icons in both the places (origin and destination folder). The icons may not be there on the desktop and in that case, just search out the folder where the icon exists.

Once you added the programs in the startup folder, the next time, when you boot your system, your favorite programs will be autoloaded along with the boot process.

[adinserter block=”7″]

As a technology lover you may like our daily important technology news series. It’s a playlist and you can retrieve the total day-wise videos. Please consider subscribing our YouTube channel:

Author: Technology and Beyond

Tagged : /

Get Rid of your Old Sluggish PC and Upgrade to a Faster Computer for Free

A New York City startup brings CloudReady for students to work on, instead of Macs and Windows PCs. This software is completely free for individual users. The machine will eventually be called a chrome laptop or chromium book but not chromebooks, as that name is trademark for laptops created by Google and its partners. This operating system is created to provide an amazing experience of working with all google apps and services without any interruption.

What is cloudReady?

CloudReady is an operating system developed by Neverware. It can make your computer function like a chromebook. It currently runs on basic ARM based chipset hardware. Since PC’s hardware is more powerful, one can easily experience this for free on a PC. It also has bunch of apps from Google like Google doc, sheets etc. There are a few drawbacks like, it doesn’t allow automatic updates on PCs and Mac manufactured since 2007. Also it cannot be dual booted with any other operating system. So, you need to make sure that you have a backup of all your important data.

Pre-Requirement

  1. A 8GB/ 16GB USB Drive which is the optimum size suggested by CloudReady.
  2. Chromebook Recovery Utility : This tool is required to create a USB based installation drive using the CloudReady software. It can be downloaded from here.
  3. CloudReady .bin file will be required during installation. The same can be downloaded from here.

cloudready-install1

Installation process

Once, you have fulfilled the requirement described above, you are ready to proceed with the installation. It has two distinct parts:

Next page For More

Tagged : /

This is how to hack Wi-Fi password!!

Internet is now a necessity in life. Having enough money to pay for high Internet cost is still a problem. 3G connections are too costly for a common man. Hence, people generally look for Wi-Fi connections which can be used for free. Though free Wi-Fi is easily available these days, they mostly need your personal details to gain access and they are mostly time restricted.

But, there are ways out and with some guidance, free tools and with some luck you may be able to hack the Wi-Fi password and gain access to Wi-Fi hotspot, wherever you go.

First you need to search for Wi-Fi cracker software program and you can find many. You need to opt for free version and download the same in your computer.

Wifi-Password-Hack-Proof-1

Here is how you can try to get free Wi-Fi:

You must be aware of the terms WEP (wired equivalent privacy), WAP (Wi-Fi protected access), and WAP2, because, these are security algorithm that protect Wi-Fi. Once you are aware of these terms follow the steps mentioned below.

  1. Download Wi-Fi password hack and extract the zip files.
  2. Select the network you want to hack.
  3. Figure out the algorithm encryption used by them to protect the network.
  4. Click on Hack button
  5. Enter the activation key mentioned in the zip file.
  6. Click Activate.

Once you press the activate button the software is activated and searches for the network. A success message in green is displayed once the process is finished.

This is how the automated Wi-Fi security hacker works

The program scans for all available wireless networks and the contact them. During that process, it receives data packets from the network. Program decrypts the data packets by figuring out the password. While simple passwords are easier to hack, the complex passwords including capital and small letters, numbers and special characters are harder to crack. Password with only alphabets or numerals are very easy to crack. The base rate of success is around 70%.

If you have liked the article, please share it with your friends and family.

As a technology lover you may like our daily important technology news series. It’s a playlist and you can retrieve the total day-wise videos. Please consider subscribing our YouTube channel:

Author: Technology Vista

Tagged : /

THIS man becomes Magneto and walks across the ceiling upside down!

X-men – Days of Future Past, featured Magneto, the super villain, destroying a whole baseball stadium. This inspiration, led Colin furze from Lincolnshire to design these magnetic shoes that helps him walk upside down along the metal ceilings. Previously, we saw Colin Furze coming out with those amazing wolverine claws!

It is weird walking upside down but with the help of these innovative pair of shoes, it simply sounds amazing. The shoes can probably be best used at railway station for beating queues. 

Colin Furze removed one of the coils from a microwave transformer and plugged it onto a car battery to make the them magnetic. He then clamped his foot onto the transformer placed on a shoe shaped plate.

article-2636298-1E1A29E400000578-299_634x419

The shoes were attached with switches on the straps for flow of electricity that enables him to walk.

His successful attempt on learning to walk upside down has been demonstrated in a couple of videos.

width="560" height="314" allowfullscreen="allowfullscreen">

width="560" height="314" allowfullscreen="allowfullscreen">

According to Mr furze the shoes hold him with 12 volts of power that can really hurt one’s back in an attempt to walk.

[adinserter block=”7″]

As a technology lover you may like our daily important technology news series. It’s a playlist and you can retrieve the total daywise videos. Please consider subscribing our YouTube channel:

Author: Technology and Beyond

Tagged : /

THIS is how to get the best signal out of your existing Wi-Fi network without spending a penny!

Suppose, you are in middle of an exciting episode on YouTube or Netflix and Wi-Fi turns slow down. Frustrating isn’t it? Not anymore, here we are to show you some easy and simple ways to boost your Wi-Fi signals for better network coverage.

Try placing your Wi-Fi router at a central location in the house. Doors and walls can absorb and degrade signal strength. Also try keeping it at a high level above the ground for even distribution of Wi-Fi signal across your home.

Electronics likes microwaves, fluorescent lights, cordless telephones etc. may interfere your Wi-Fi signal. To avoid this, try placing your router away from electronics and metal objects

Online tools like Acrylic Wi-Fi and AirGrab Wi-Fi Radar for windows and Mac respectively can help you to find and reduce the amount of interference your Wi-Fi signal is facing.

Running firmware can be time consuming and annoying. But those updates ensure that your old router is working efficiently. Also, it is best to change your router every 7 to 8 years.

Routers generally have two antennas on top. Switch it to perpendicular position if they are parallel to each other. This ensures a strong connection between one’s home network and laptops and smartphones.

Wi-FI-boosters

The aluminum in soda and beer cans helps to extend the signal beyond the router’s normal range. All you need to do is have a clean can and then with the help of a utility knife cut across the bottom of the mouth leaving around two inches of area at the top ensuring the mouth of the can is still attached. Cut the middle of the can on the opposite to make a curve and turn it upside down. Stick one of the antenna of the router through the mouth of the can and keep it in place with help the help of a duct tape. Repeat the procedure for the other antenna and enjoy amazingly good signal strength. A note of caution here, this process is actually concentrating the signal in one direction and NOT boosting the signal as such.

Keep your Wi-Fi password protected because the speed is inversely proportional to the number of people using it. A strong password protects it from unauthorized users.

Try staggering down heavy bandwidth usage. Because the entire network is affected if too many people are in the same network doing heavy stuff like playing video games, downloading movies or watching Netflix.

Generally, routers have about 150 feet of range. One must use Wi-Fi repeater in cases where devices and computers are at a distance from the router. Wi-Fi repeater can be plugged into any wall outlet.

If you have liked the tips, please pass it on to your near and dear ones so that they also benefit from the suggestions.

Did our suggestion make your Wi-Fi network better? Please provide your comments below.

[adinserter block=”7″]

As a technology lover you may like our daily important technology news series. It’s a playlist and you can retrieve the total daywise videos. Please consider subscribing our YouTube channel:

Author: Technology and Beyond

Tagged : /

THIS is how someone can hack into your WhatsApp account!

Knowing one’s secret can be amazing and interesting and sometimes, it may be devastating too! Parents feel like hacking into their children WhatsApp account and partners want to access their partner’s WhatsApp account. We are not encouraging hacking here. Rather, we are bringing out this information so that you are more knowledgeable in this regard and nobody can hack you so easily!

The next question, that comes to our mind how somebody can hack into your WhatsApp account? Don’t worry you are just a few steps away from learning it.

Warning: HACKING IS AN OFFENCE. We share this only for information and knowledge sharing purpose. Remember that you own the total responsibility for any hacking activity that you are carrying out!

Below are the few methods of actually hacking into someone’s WhatsApp account. Please remember that you need brief physical access to target’s phone in all the methods.

Method 1: Using WhatsApp PC version and Target’s phone:

  1. Open web.whatsapp.com in your pc browser.
  2. Then go to his/her WhatsApp messenger app > options > WhatsApp web.
  3. Scan the QR code displayed on the pc screen. You can now see all WhatsApp chats of the target
  4. Do not forget to check ‘Keep me logged in‘ option for future usages.

Note: Whenever you want to access target’s WhatsApp, he/she should be connected to working Internet connection.

Method 2: By Using Target’s Phone

MAC-spoofing

Step 1: Uninstall WhatsApp from your phone.

Step 2:  Get hold of the phone you want to hack.

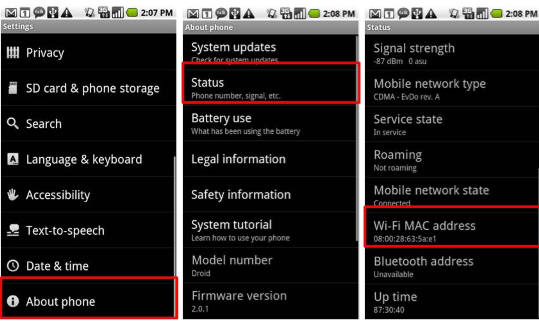
Step 3:  Find the MAC address of that phone. It’ll be in six pairs like- 01:43:65:87:98:cb

For Android, go to Settings – About phone – Status – WI-Fi MAC address.
For iPhone, go to Settings – General – About – WI-Fi Address.
For Windows phone, find this in Settings – About – More info – MAC address.
For BlackBerry, go to Options – Device – Device and Status info – WLAN MAC.

Step 4: Now find your MAC address also and save both MAC addresses at any safe place.

Step 5: Install MAC spoofing apps for changing the MAC address of your phone. For iPhones install MacDaddy X or WifiSpoof. And for Android you can install some free apps like BusyBox and Terminal Emulator, which are available on Google play store.

Step 6: Now open the app in the terminal, type “IP link show” to see a list of interfaces. Identify the one that has your MAC address and select it.

Step 7: Install WhatsApp on your phone but do not enter your phone number, enter your target’s phone number to set up WhatsApp rather than your own.

Step 8: When you no longer need to access your target’s WhatsApp account, change your MAC address back to what it was. By following the same method as above.

Next page For More

Tagged : /
Verified by ExactMetrics